
If you’ve always wanted to teach your child how to tell time on an analog clock, here are three fun and easy time-telling activities you can do at home. Learning how to tell time, takes time, which makes these activities perfect for a day when you and your child are stuck at home due to illness, vacation, or the pandemic. You’ll find that these fun crafts not only pass the time, but teach your child how to tell time, a most important skill. So get ready to make a paper plate clock, a round table clock, or some delicious clock-face sugar cookies!
Make and Tell Time with a Paper Plate Clock
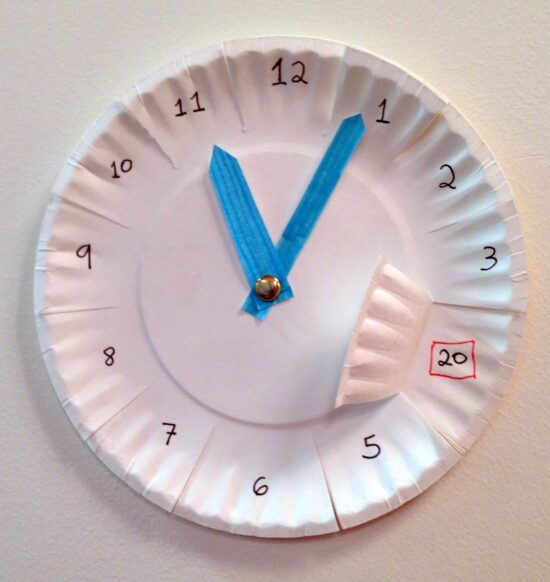
Telling time on a digital clock may be easy, but learning how to tell time on a regular, analog clock is a challenge for most children. The good news is that even the most craft-challenged parent can handle this easy-to-make paper plate clock. Once you make the clock, your child can spin the hands and tell what time it is. The top plate has the hours, the bottom plate displays the minutes. It’s knowing the minutes that’s the hardest part, but this craft comes with a clever reveal. Fold over the tab at the minute hand to reveal the correct answer below.
Paper Plate Clock
You will need:
- Two paper plates
- A pen
- Glue
- A Brad
- Colored construction paper
- A hole punch
Instructions:
- Write the numbers 1-12 around the perimeter of one paper plate to resemble a clock face.
- Make cuts between each number to create tabs that can be folded in toward the center of the clock.
- Write the minute numbers 00, 05, 10, and etc. around the perimeter of the second plate to line up with the numbers on the first “clock face” plate.
- Punch a hole in the center of each plate so the holes match up.
- Spread a dab of glue around the center hole on the second plate (the one with minutes 00, 05, and so forth on it) and lay the clock face plate on top.
- With a pencil, draw two clock hands on a piece of construction paper, one longer than the other, for hour and minute hands to fit your clock face, then cut them out with a scissors.
- Use the brad to join the two plates together and to attach the two paper clock hands.
- Now you have a paper clock with movable hands. Use the clock to help your child practice how to tell time to the correct minute. If the minute hand is pointing to the 8, have your child fold the 8 tab toward the middle of the clock to reveal the hidden number 40 below. Move the hands to different positions around the clock face, asking your child to tell you what time it is now.
Practice How to Tell Time with this Round Table Clock
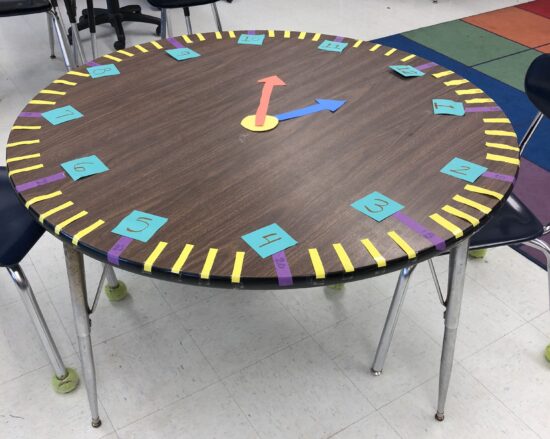
This brilliant round table clock comes from Kasey Fletcher and it’s probably the next level up from the paper plate clock, above. There’s no reveal here, so you can test your child’s mastery in telling time to the minute, with this simple craft. You probably already have everything you need to make this ingenious craft, and help your child learn how to tell time, at home.
Round Table Clock
You will need:
- A round table
- Construction paper in four colors
- Scissors
- Colored masking tape in two colors
- A pen or marker
- Optional: Grab bag of small prizes (for instance: whistle, magnet, bubbles, marbles, small dolls, plastic animals, candy)
Instructions:
- Cut a round circle out of construction paper, and tape it to the center of the table with a small loop of tape taped to the underside of the center of the circle.
- Cut out two clock hands, one longer than the other and placing one over and one under the circle at the center of the table, but do not tape them.
- Place 12 lengths of colored tape to mark off 5 minutes, 10 minutes, 15 minutes, and etc., all around the table.
- Place 44 shorter lengths of your second color of tape around the table, to mark off the minutes between.
- Cut out 12 squares and number them 1 through 12, placing them in order around the table to represent the hours on the clock face.
- Move the hands to display different times on your round table clock face, and have your child tell you what time it is.
- Optional: every time your child guesses the correct time, let him choose one prize from the grab bag. This is optional, but helps to motivate children to keep the game going, while making it fun to tell time.
Tell Time Deliciously with Clock Face Sugar Cookies
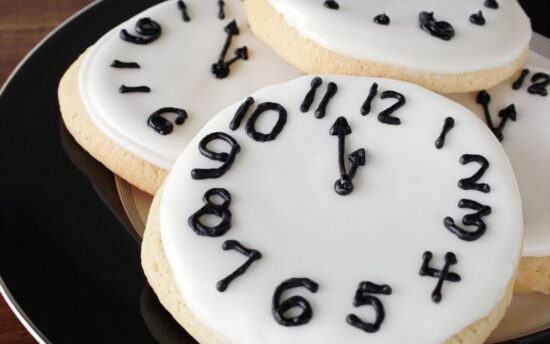
Kids of all ages—including adults—love to eat cookies. So what better way to teach a child to tell time than through their tummies? Make the sugar cookie dough, let your child roll the dough into balls and place them on the cookie sheet. After you bake and cool them, pipe clock faces on the cookies with store bought writing or gel icing, and let your child guess what time they say. Every time they guess the correct time, they get to eat the cookie!
This recipe makes 2 dozen delicious cookies, so let the whole family have a chance to tell time and join in the fun. That way, no one person will eat too many cookies! This is an activity that is best played after lunch or dinner, so it won’t spoil your child’s appetite.
Clock Face Sugar Cookies
Yield: 2 dozen cookies
You will need:
- 1 cup granulated sugar
- 1/2 cup unsalted butter softened
- 1 teaspoon vanilla extract
- 1 egg
- 2 2/3 cups flour
- 1/2 cup sour cream
- 1 teaspoon baking powder
- 1/2 teaspoon baking soda
- 1/2 teaspoon salt
- 1/4 teaspoon nutmeg
Instructions:
- Sift dry ingredients together. Cream sugar, butter, vanilla and egg until light and fluffy. Add sour cream. Stir in dry ingredients with wooden spoon to make a dough Cover with plastic wrap. Refrigerate dough 1 hour.
- Preheat oven to 425°F.
- Roll dough into 1″ balls and place on 2-3 parchment-lined cookie sheets, spacing cookies well apart.
- Bake cookies 6-8 minutes or until lightly browned. Place cookie sheets on cake racks, to cool completely.
- Use store-bought decorative piping gel or writing icing to draw clock faces on the cookies, drawing a different time display on each cookie. Kids have to read the time correctly in order to eat a cookie!
Varda Meyers Epstein serves as editor in chief of Kars4Kids Parenting. A native of Pittsburgh, Pennsylvania, Varda is the mother of 12 children and is also a grandmother of 12. Her work has been published in The Washington Post, The Huffington Post, The Learning Site, The eLearning Site, and Internet4Classrooms.